学习SwifUI的最好方式是,用SwiftUI编写一个程序
文章来源:Introducing SwiftUI: Building Your First App
注:视频中使用的部分API,已经在后续版本中废弃,本文代码根据最新版API进行了调整,确保 Demo工程 能够运行
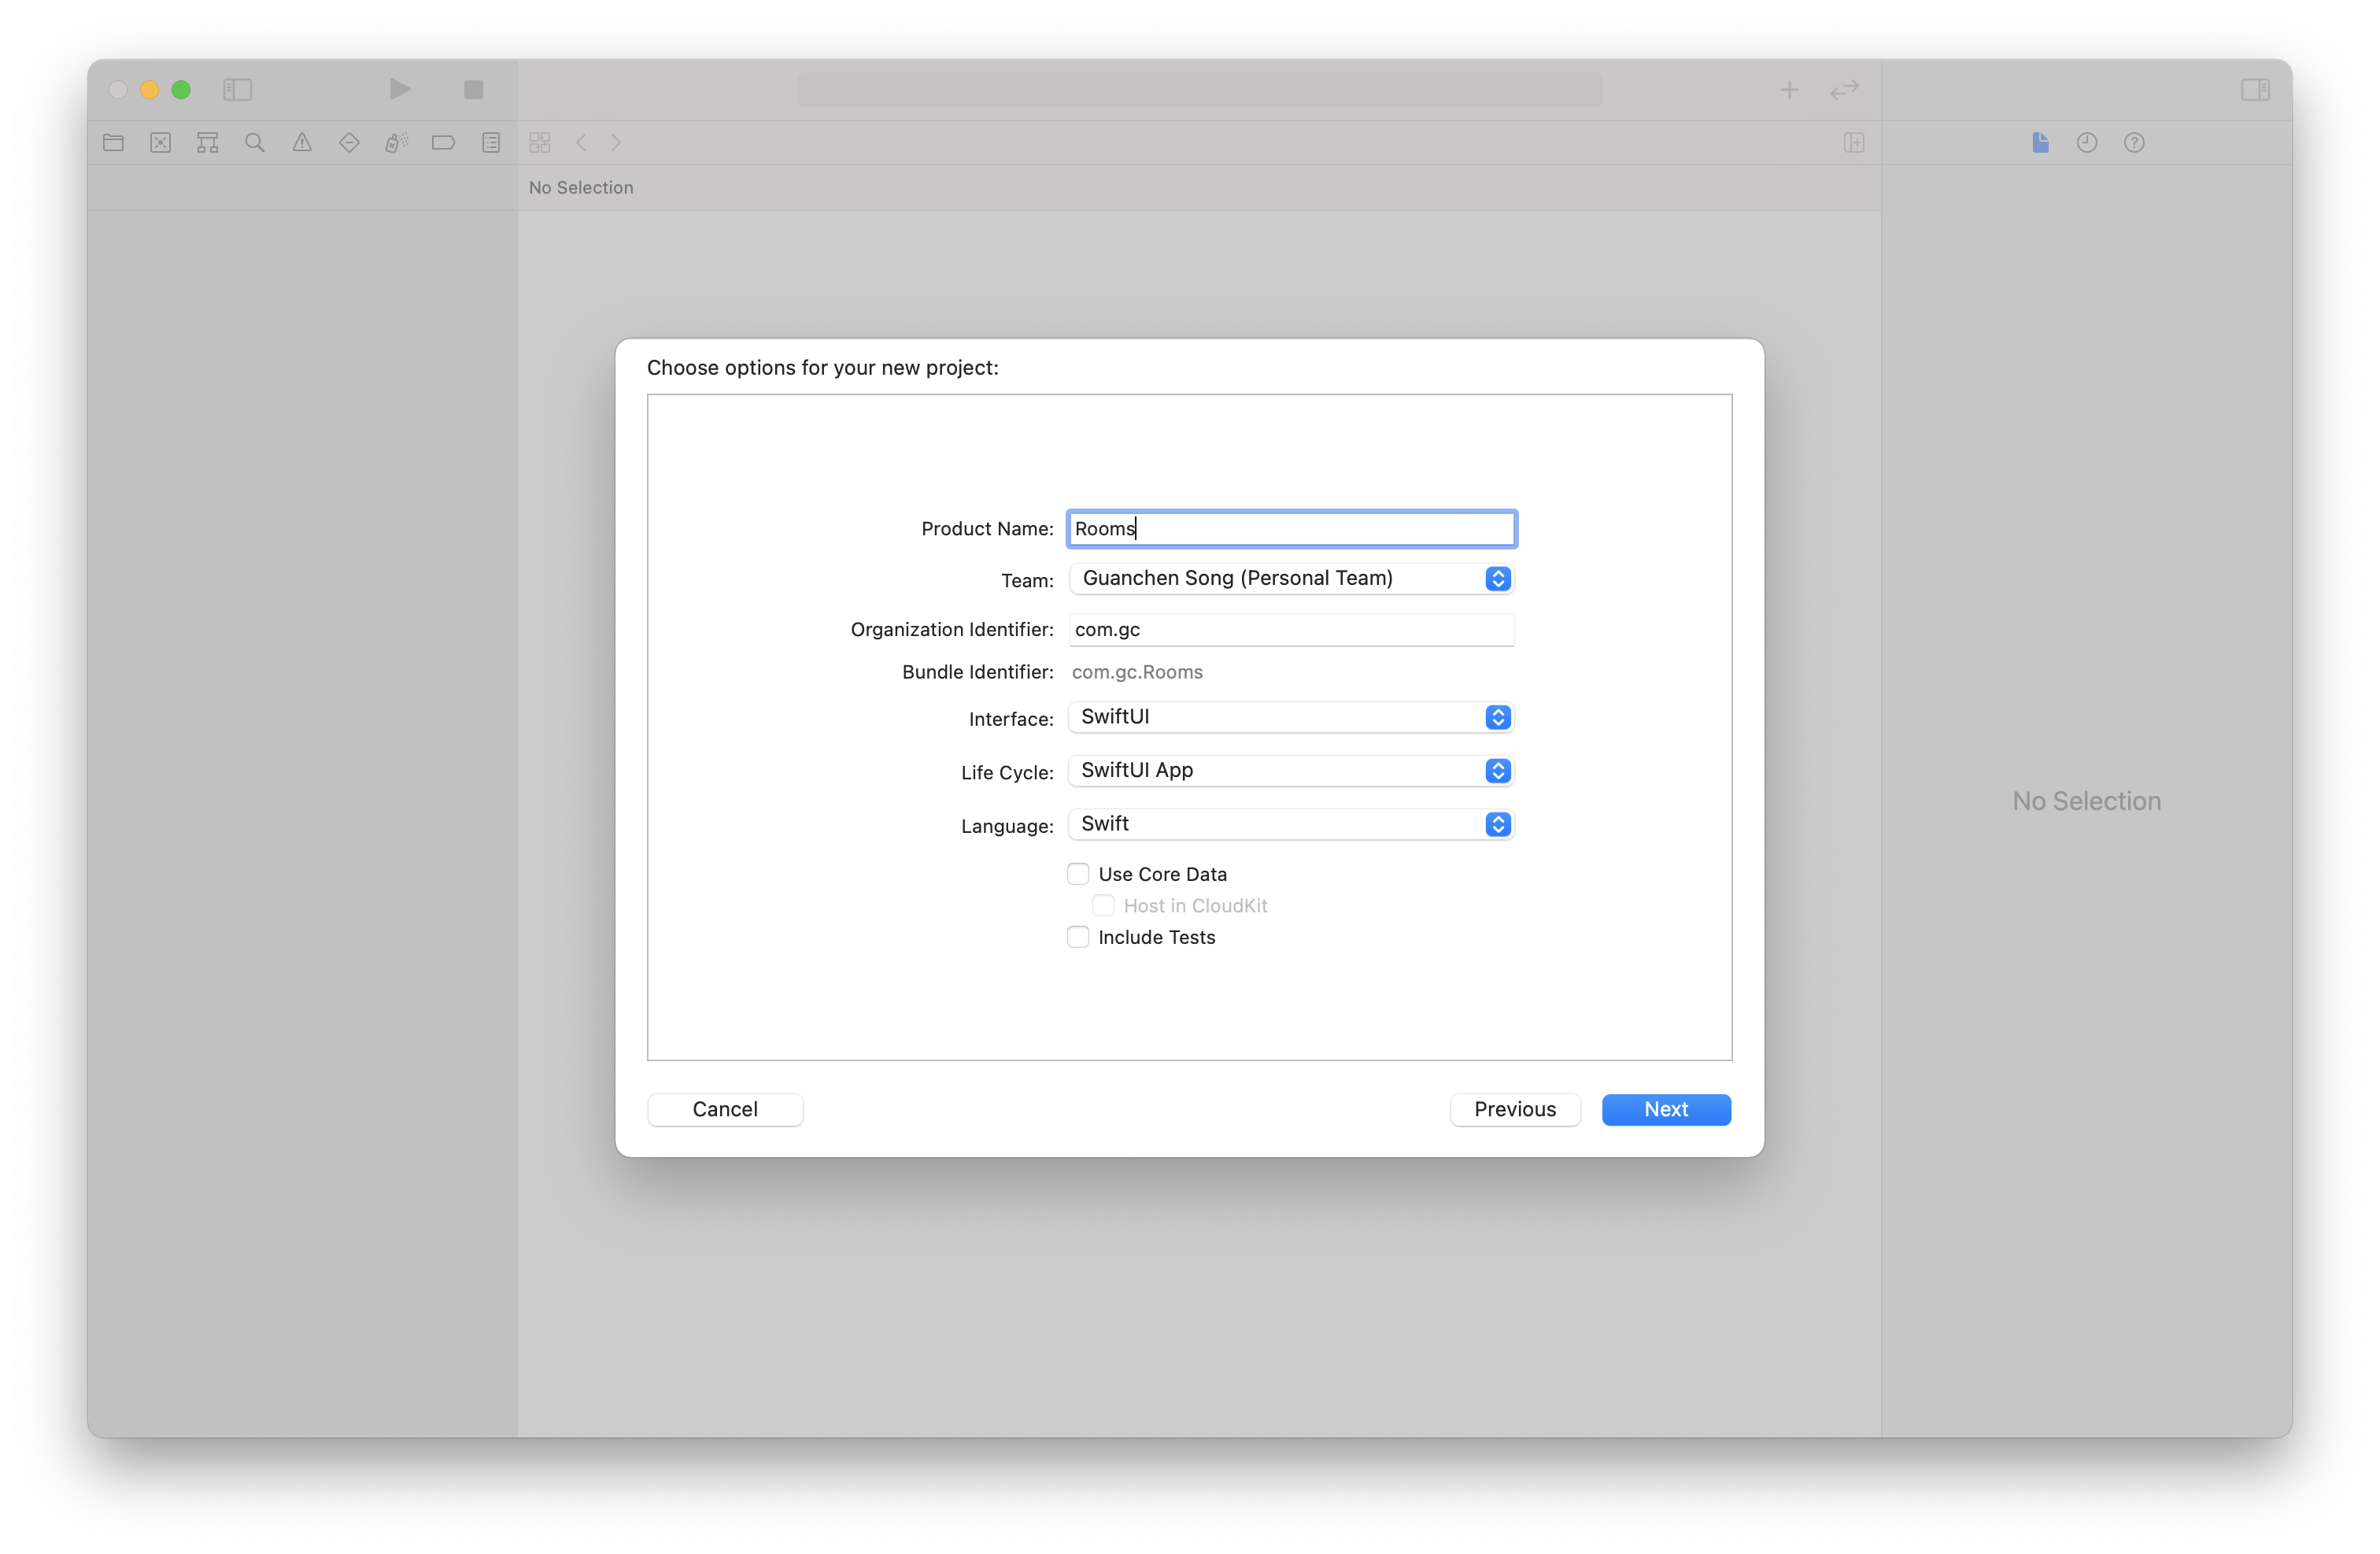
一:编写第一个SwiftUI程序
- 创建SwiftUI工程
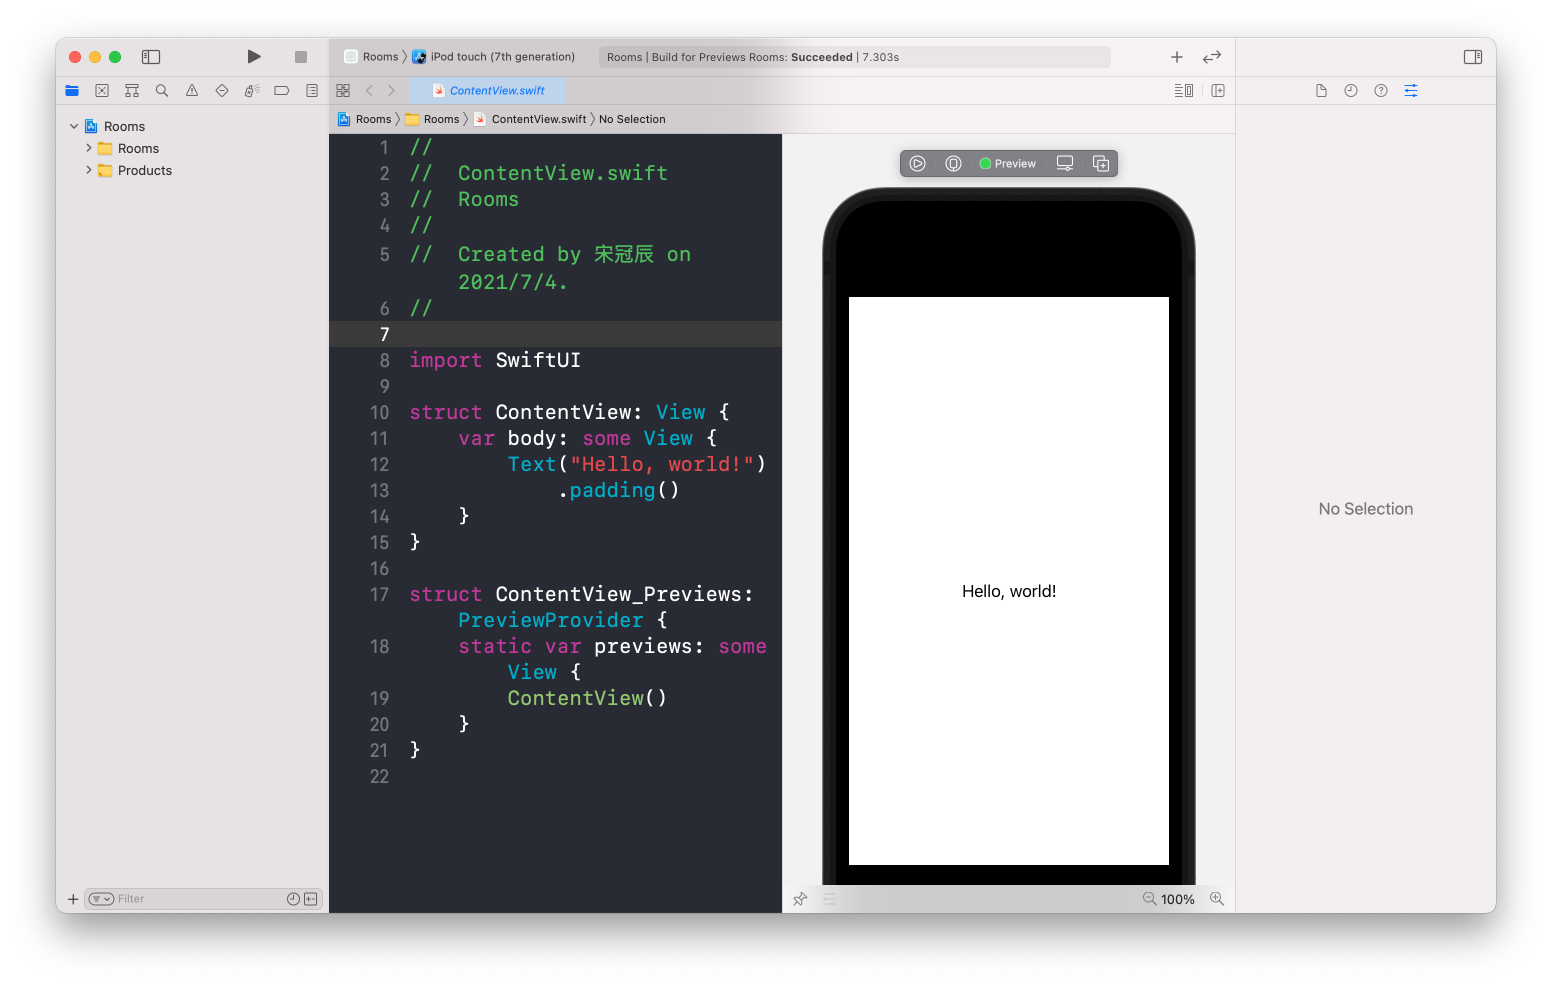
左侧是代码区
右侧是Canvas
编写代码时,右侧的Canvas能够实时显示出代码的UI预览效果
编写UI布局代码
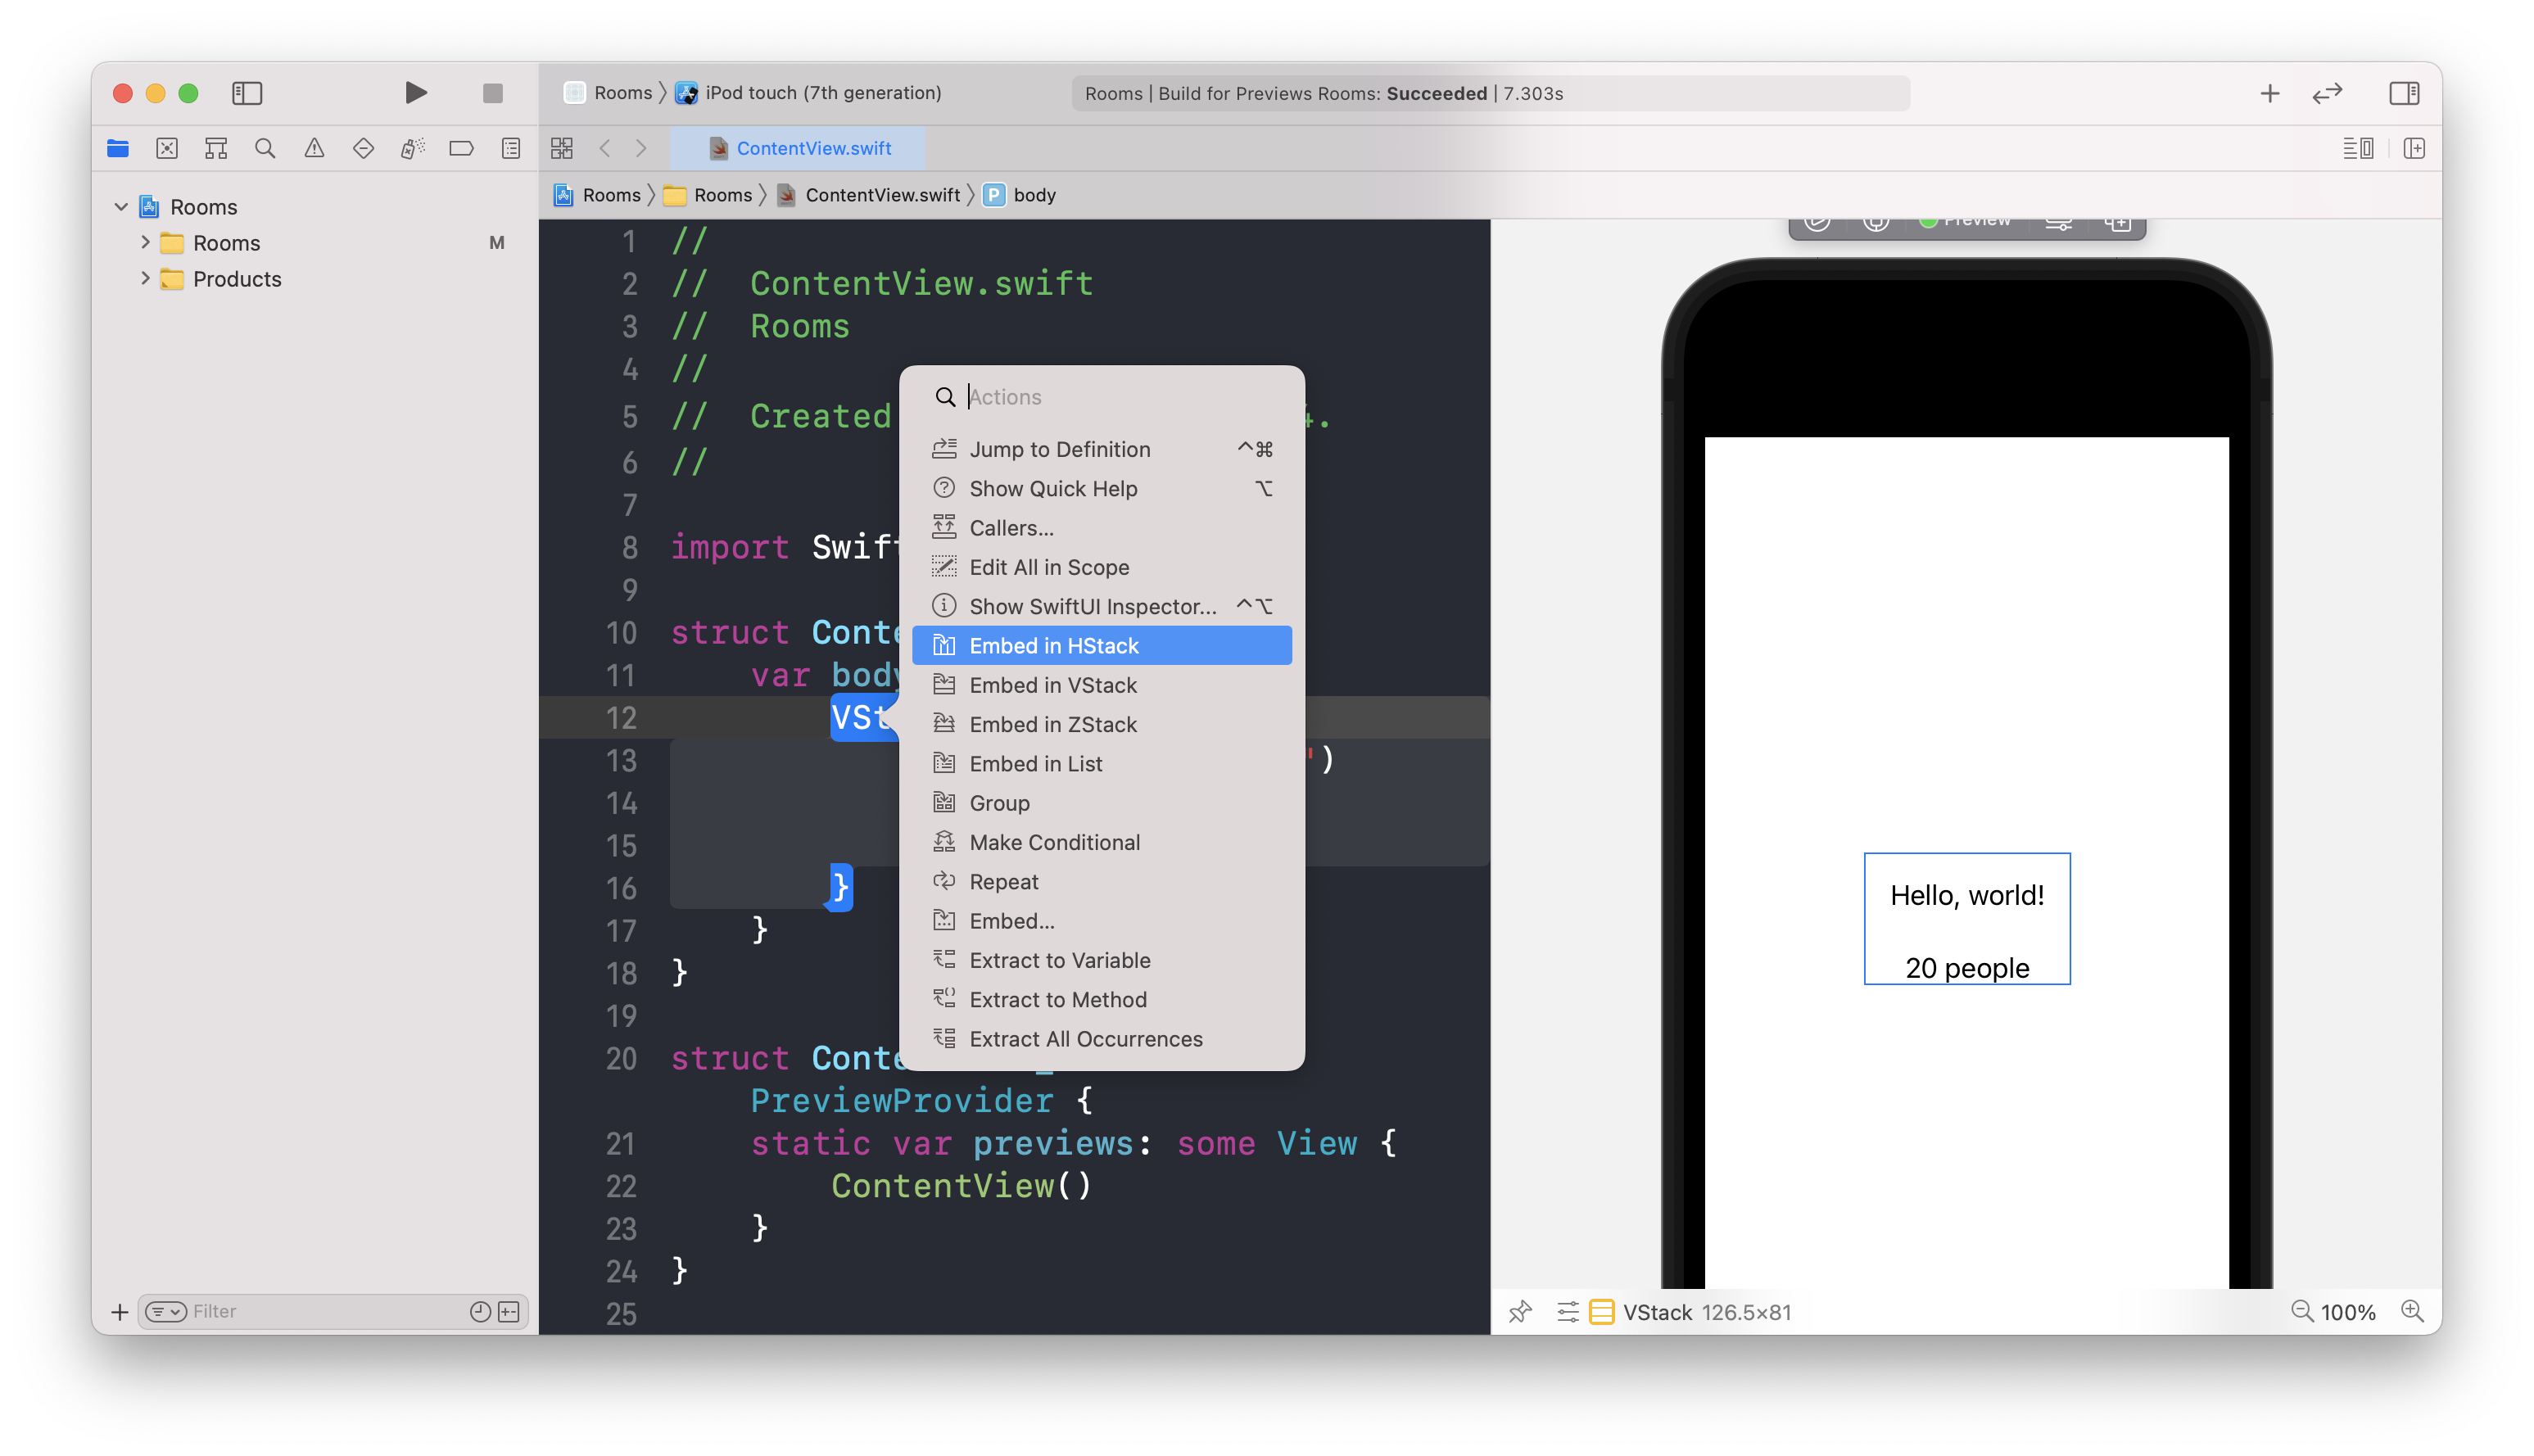
通过拖拽增加UI控件

- VStack:SwiftUI常用的一种布局元素,可以用来垂直地叠加视图
- HStack:水平叠加视图
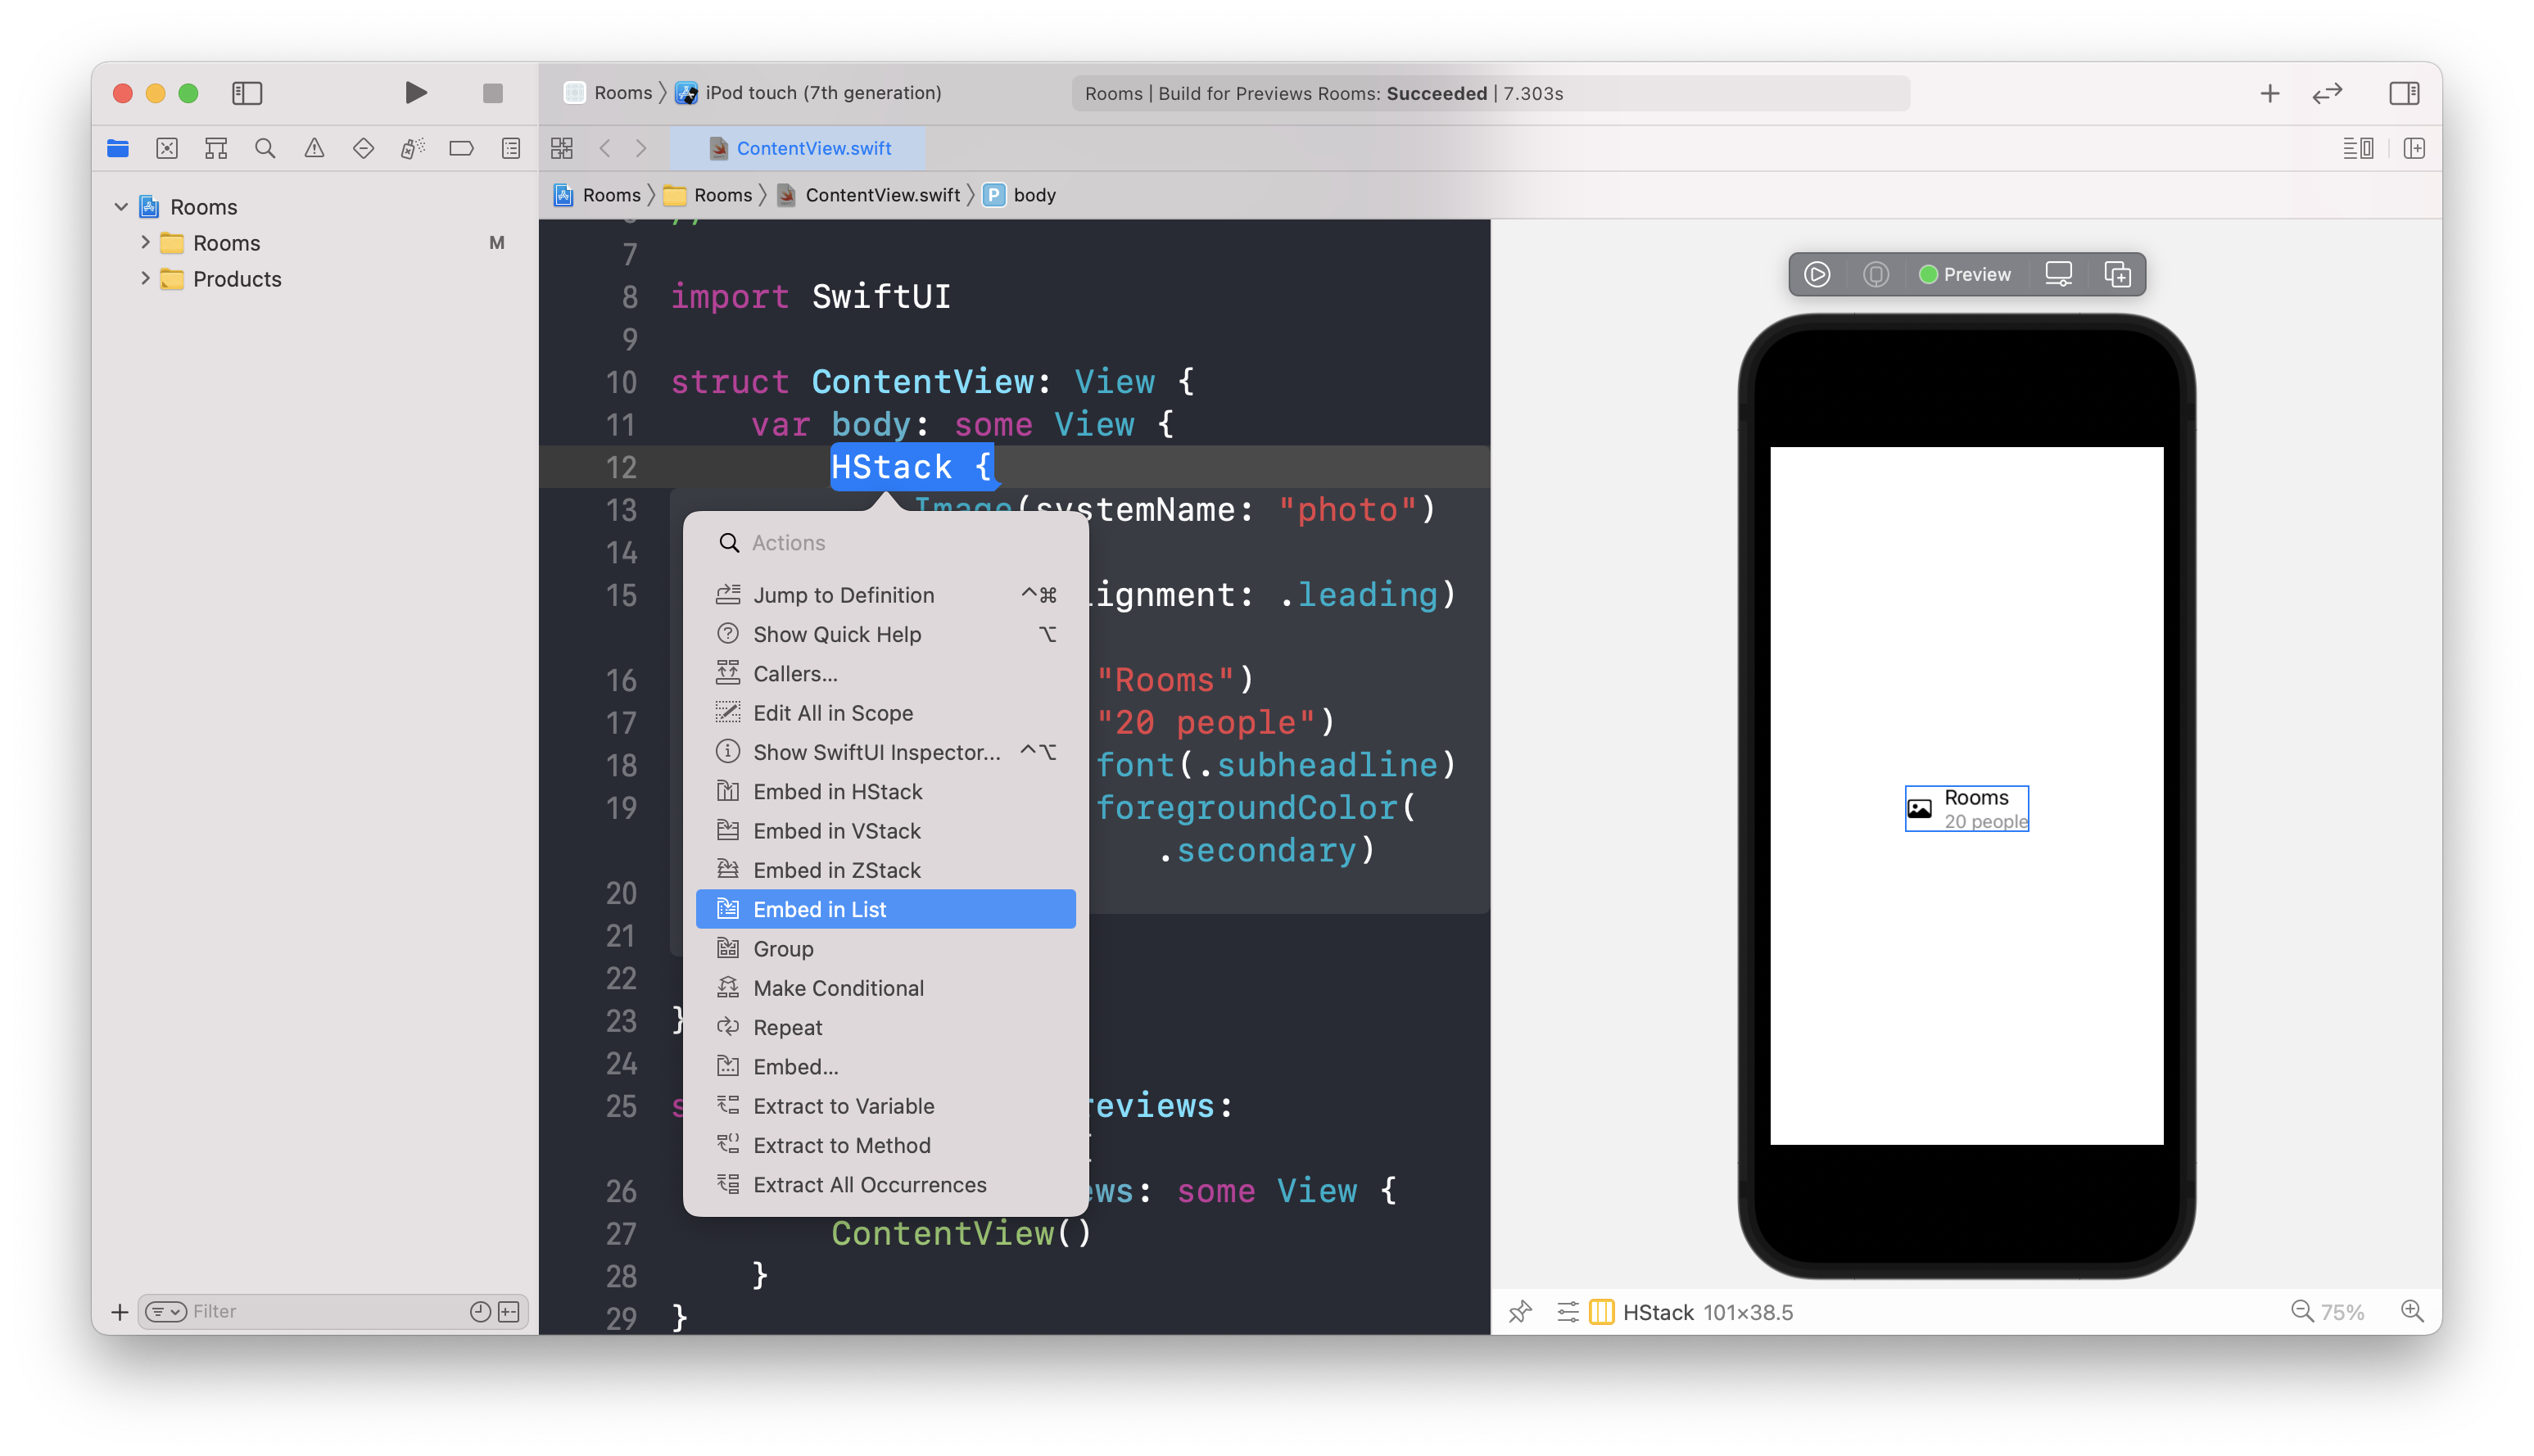
cmd+点击VStack,插入HStack
1
2
3
4
5
6
HStack {
VStack {
Text("Rooms")
Text("20 people")
}
}在文字左侧增加一个图片
1
2
3
4
5
6
7
8
9
HStack {
// `photo`是系统自带资源库中的图片
Image(systemName: "photo")
VStack {
Text("Rooms")
Text("20 people")
}
}在Canvas中将VStack修改为左对齐

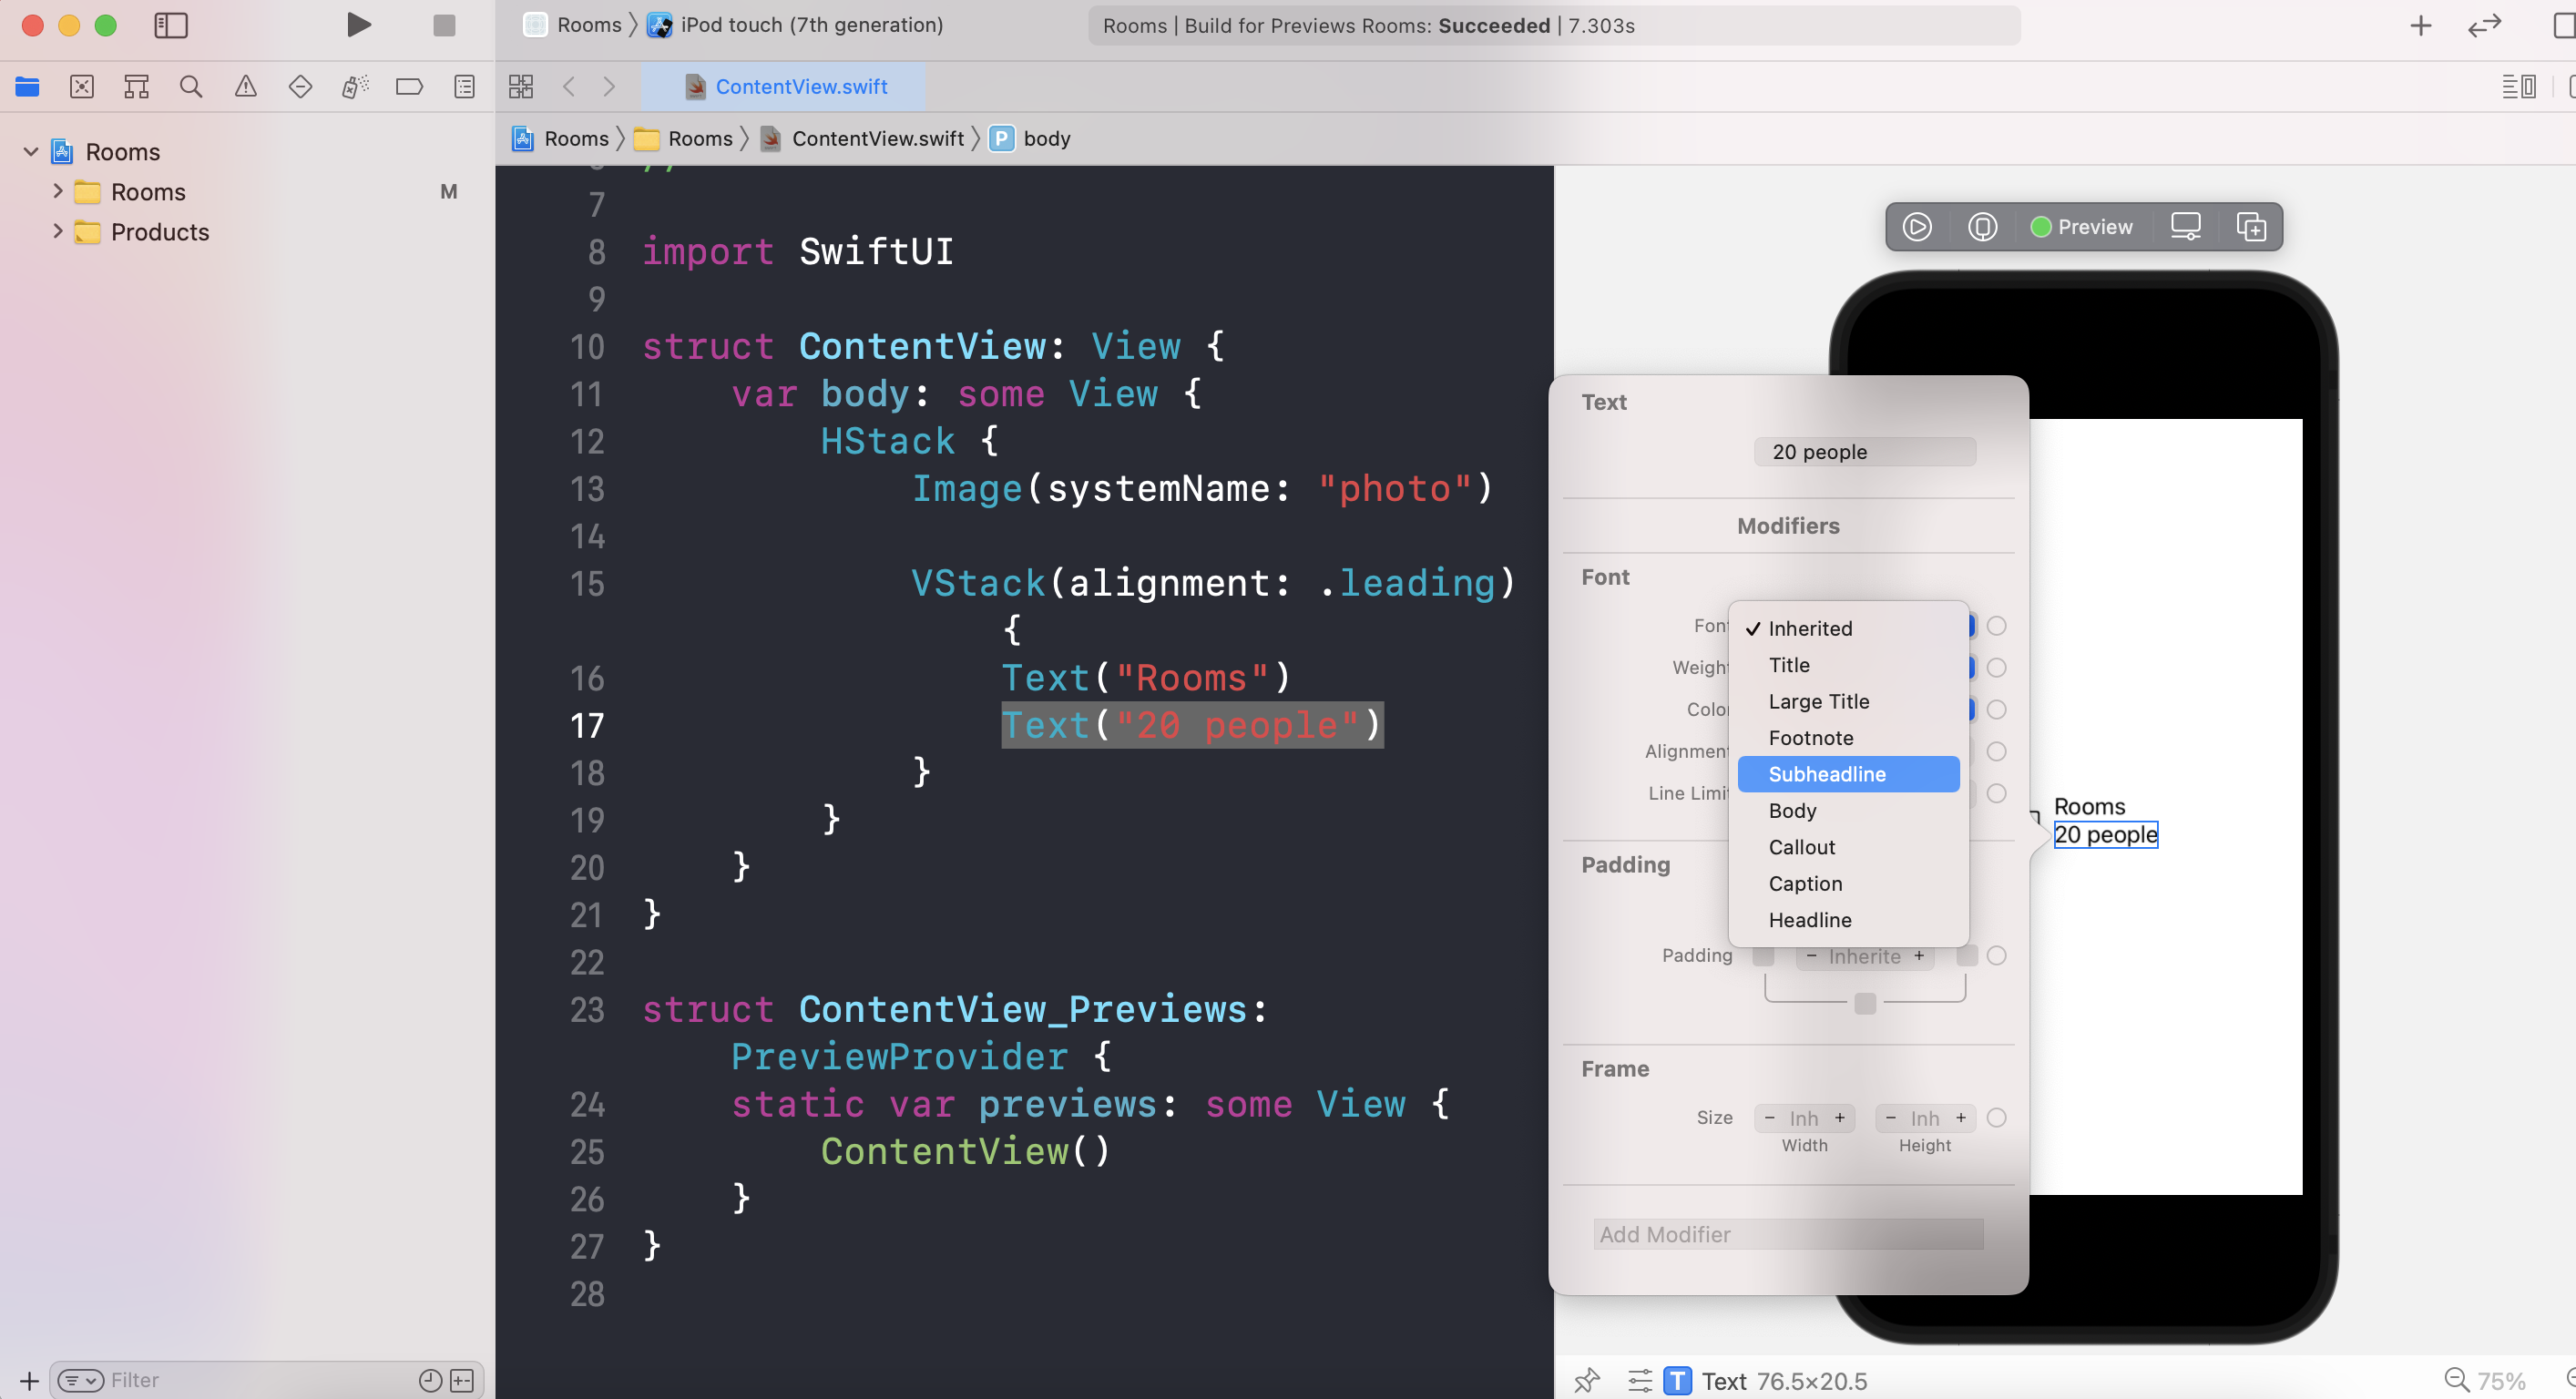
设置Text的字号
1
2
3
4
5
6
7
8
9
HStack {
Image(systemName: "photo")
VStack(alignment: .leading) {
Text("Rooms")
Text("20 people")
.font(.subheadline)
}
}我们称
.font(.subheadline)为修饰器(modifier),用来自定义视图的外观或行为设置Text的颜色为
secondary1
2
3
4
5
6
7
8
9
10HStack {
Image(systemName: "photo")
VStack(alignment: .leading) {
Text("Rooms")
Text("20 people")
.font(.subheadline)
.foregroundColor(.secondary)
}
}将HStack替换为List
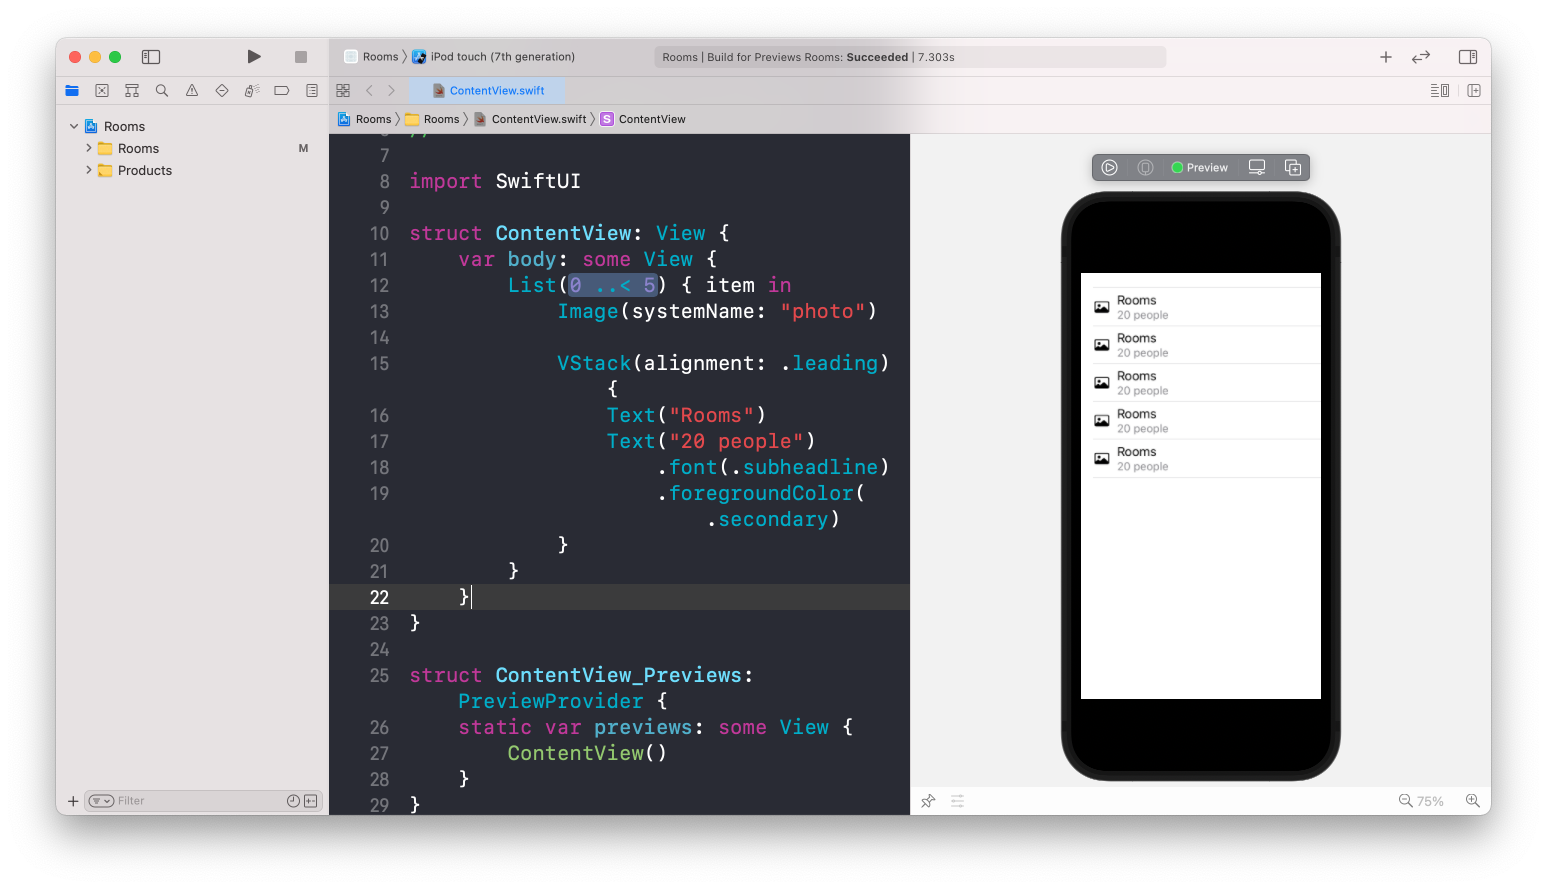
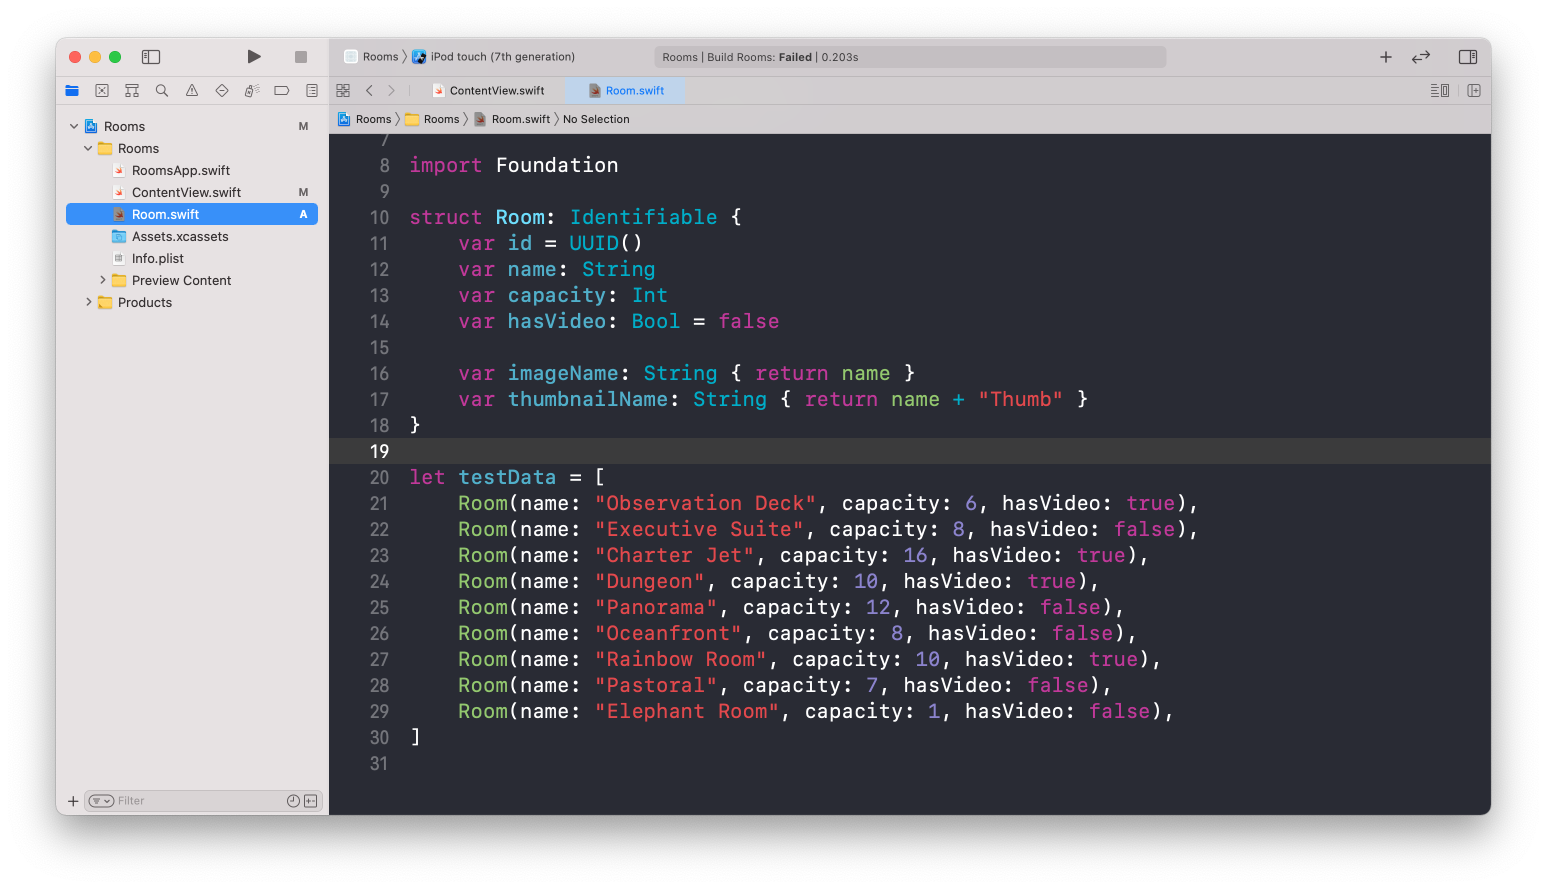
设置数据源
增加Room模型
在SwiftUI中,需要让模型遵循
Identifiable协议,实现id属性
在ContentView中使用Room数据来展示UI
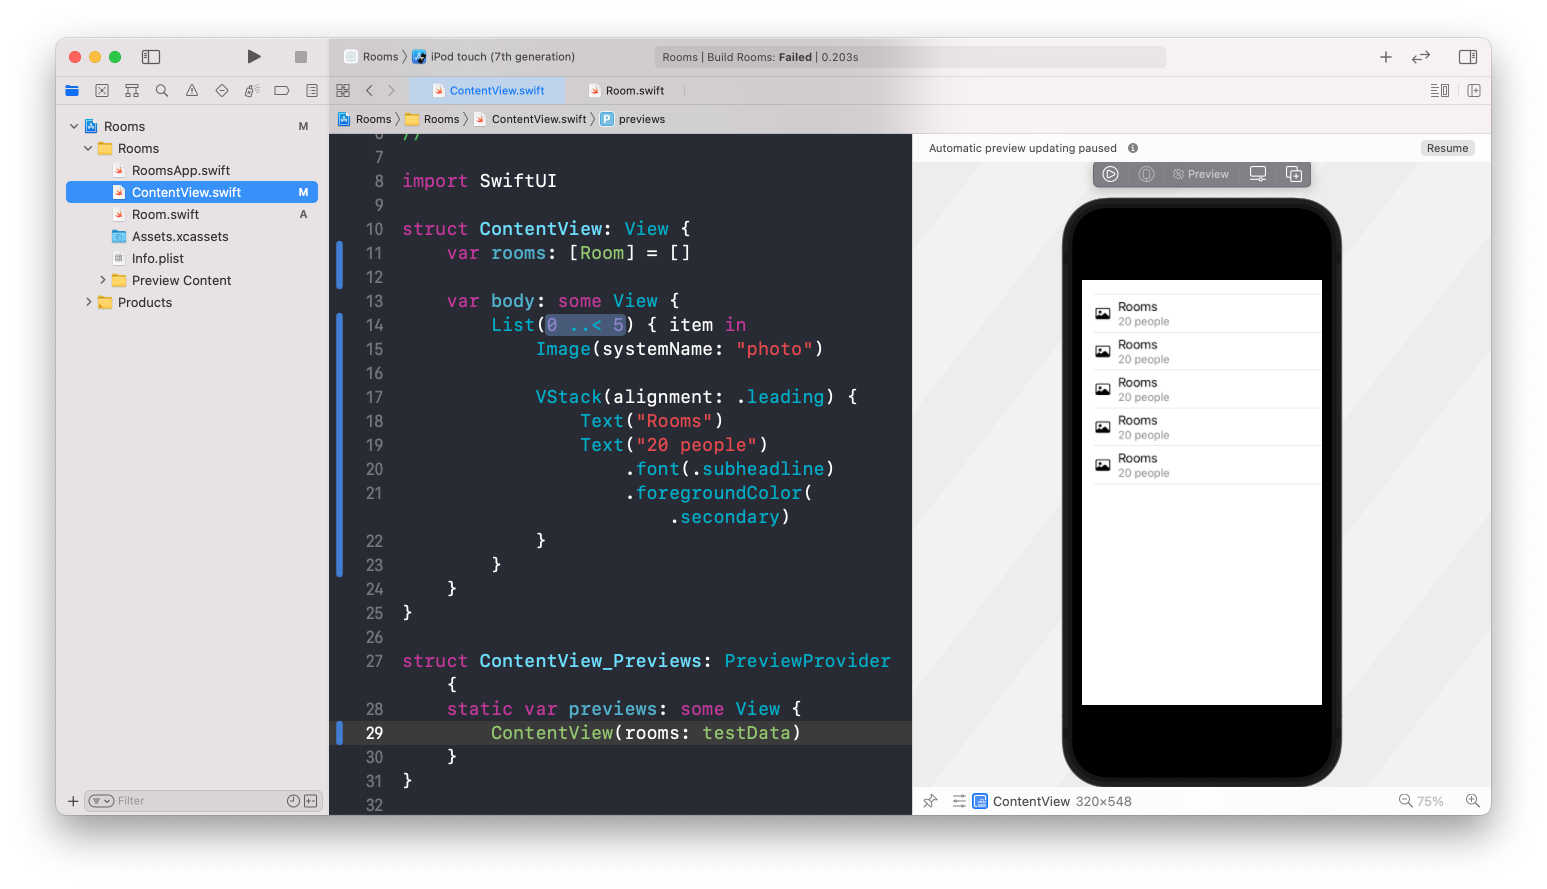
当代码发生重大改变(比如增加属性),Xcode会暂停预览,直到我们做好重新更新的准备(点击Resum按钮)
丰富UI内容
设置图片圆角
通过拖拽Modifier库来实现

设置Navigation、NavigationTitle以及给每个单元格设置跳转
1
2
3
4
5
6
7
8
9
10
11
12
13
14
15
16
17NavigationView {
List(rooms) { room in
NavigationLink(destination: Text(room.name)) {
Image(systemName: "photo")
.cornerRadius(8.0)
VStack(alignment: .leading) {
Text(room.name)
Text("\(room.capacity) people")
.font(.subheadline)
.foregroundColor(.secondary)
}
}
}
.navigationTitle(Text("Rooms"))
}
进入实时模式,查看效果

将子视图提成一个单独的视图

创建新的页面:RoomDetail
1
2
3
4
5
6
7
8
9
10
11
12
13
14struct RoomDetail: View {
let room: Room
var body: some View {
Image(room.imageName)
.resizable()
.aspectRatio(contentMode: .fit)
}
}
struct RoomDetail_Previews: PreviewProvider {
static var previews: some View {
RoomDetail(room: testData[0])
}
}设置
navigationBarTitle1
2
3
4Image(room.imageName)
.resizable()
.aspectRatio(contentMode: .fit)
.navigationBarTitle(Text(room.name))此时页面不会更新,因为RoomDetail中缺乏
NavigationView作为上下文在预览中添加
NavigationView上下文1
2
3
4
5
6
7struct RoomDetail_Previews: PreviewProvider {
static var previews: some View {
NavigationView {
RoomDetail(room: testData[0])
}
}
}调整
navigationBarTitle的展示模式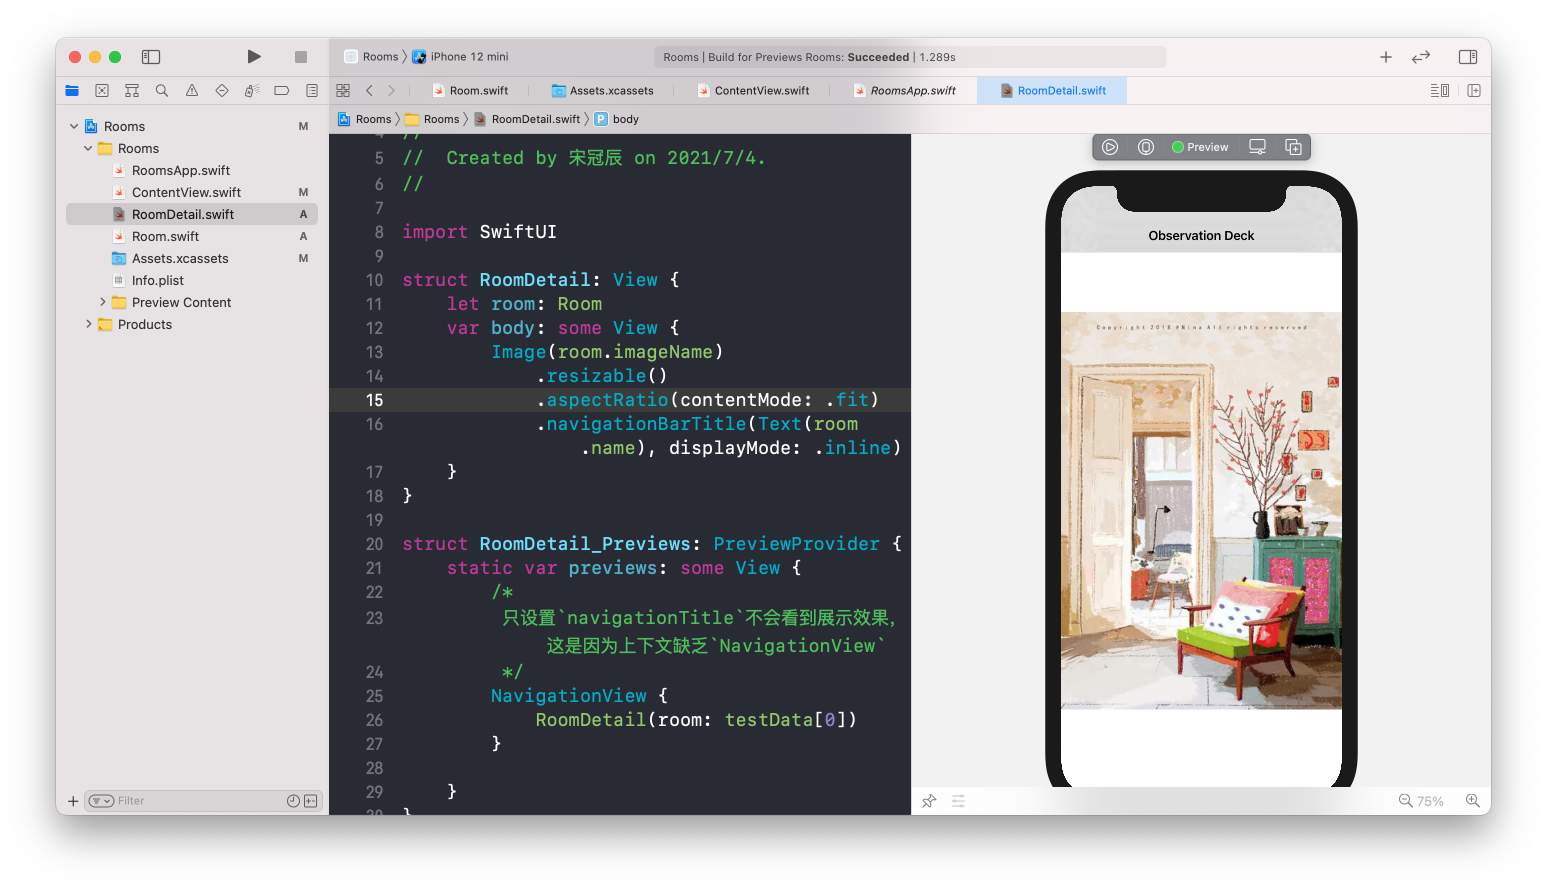
将RoomCell的跳转修改为前往RoomDetail页面
1
2
3
4
5
6
7
8
9struct RoomCell: View {
let room: Room
var body: some View {
NavigationLink(destination: RoomDetail(room: room)) {
// ···
}
}
}
二:Swift UI的工作方式
2.1 View
A View Defines a Piece of UI
在SwiftUI中,视图是一种遵守
View协议的结构,而不是继承自基础类的类A View Defines its Dependencies
2.2 状态属性
@State当SwiftUI看到一个带
@State状态变量的视图时,它会以视图的名义为那个变量分配存储空间。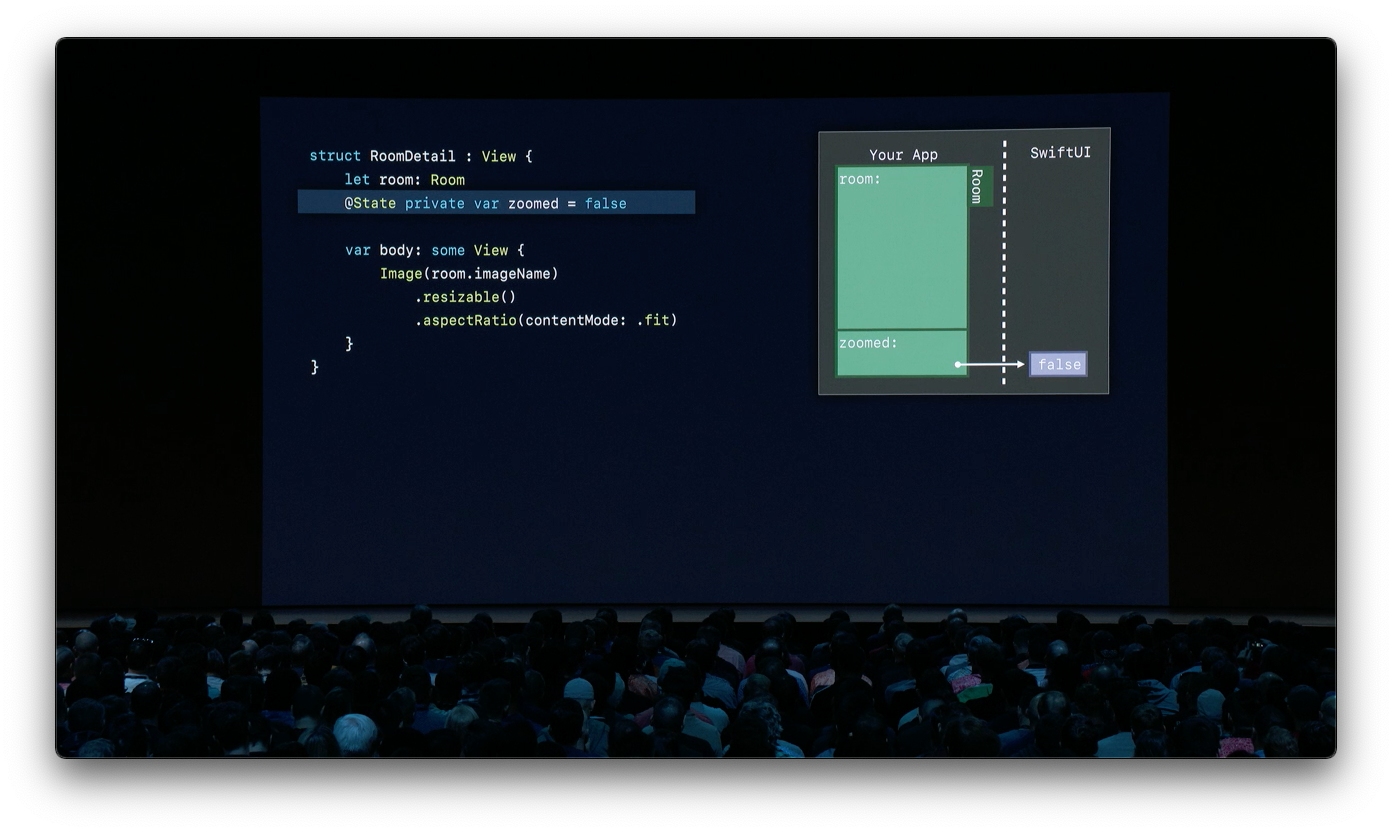
- 绿色部分是APP的内存
- 紫色是SwiftUI所管理的内存
SwiftUI可以观察到
@State变量合时被读写,同时SwiftUI知道zoom是从body中读取的,SwiftUI会在@State变量发生更改时,使用新的状态值,刷新渲染。
例:实现在RoomDetail中,点击图片修改填充模式
1 | struct RoomDetail: View { |
2.3 事实来源
在SwiftUI中,UI可能因不同的数据,处于不同的状态,我们将这些用来绘制UI的数据称为“事实来源”,“事实来源“由状态变量和模型共同组成。
- 属性可以简单地分为:事实来源(Source of Truth)和衍生值(Derived Value)
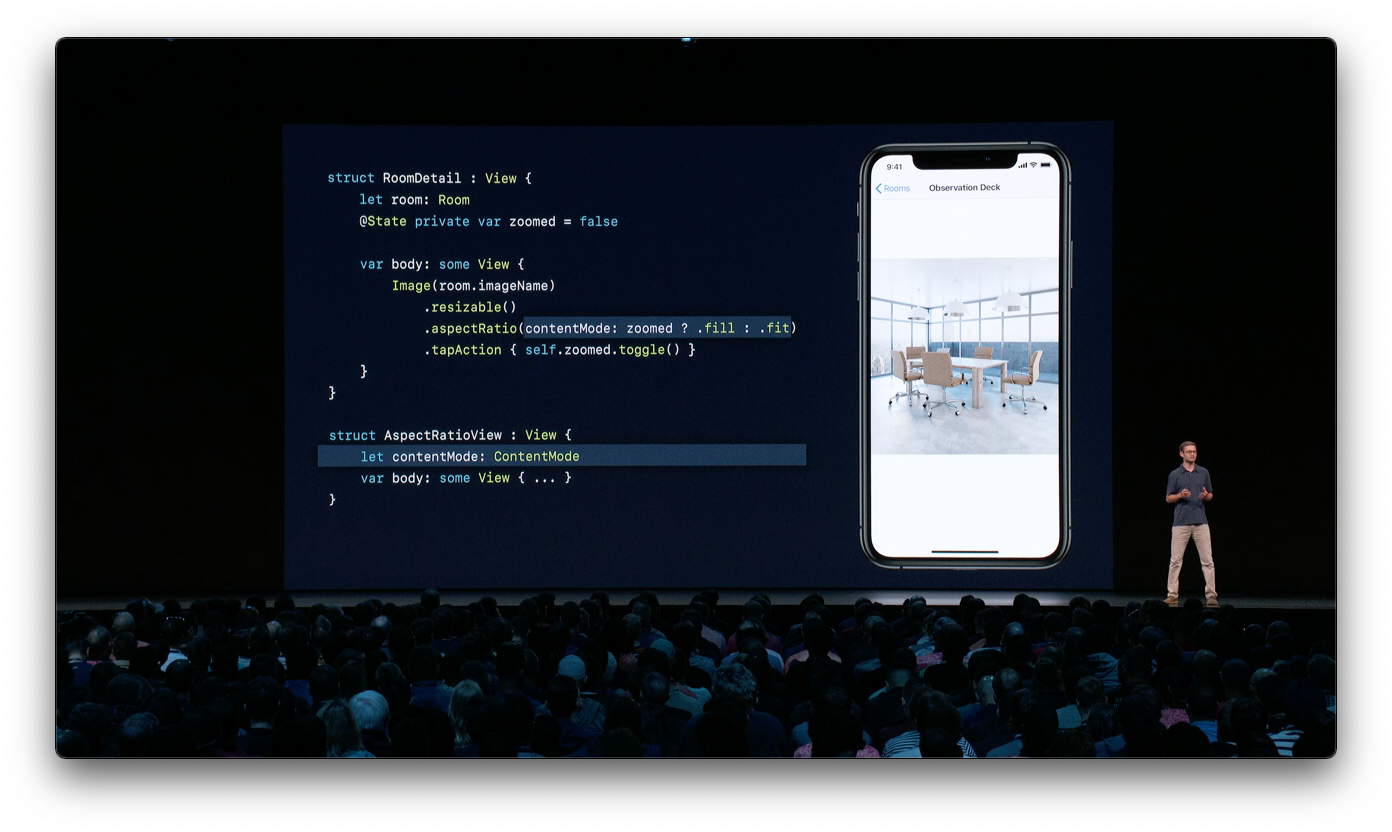
zoomed变量是一个事实来源,contentMode衍生自它,当系统观察到zoomed变量发生变化时,SwiftUI框架会请求新的body,刷新渲染,重新生成一个新的宽高比视图,接下来覆盖contentMode。
像RoomDetail中的,
room属性,也是一个衍生值。
数据流原语(Data Flow Primitives)

关于数据流详细的介绍在:Data Flow Through SwiftUI WWDC 19
SwiftUI是数据驱动,而不是事件驱动
三:完善Rooms APP
增加动画
1
2
3
4
5.onTapGesture {
withAnimation {
self.zoomed.toggle()
}
}添加一个ZStack
1
2
3
4
5
6
7
8
9
10
11
12
13
14
15ZStack(alignment: .topLeading) {
Image(room.imageName)
.resizable()
.aspectRatio(contentMode: zoomed ? .fit : .fill)
.navigationBarTitle(Text(room.name), displayMode: .inline)
.onTapGesture {
withAnimation {
self.zoomed.toggle()
}
}
Image(systemName: "video.fill")
.font(.title)
.padding(.all)
}
固定图标的位置
1
2Image(room.imageName)
.frame(minWidth:0, maxWidth: .infinity, minHeight: 0, maxHeight: .infinity)
更多关于SwiftUI布局相关的内容 - > Buiding Custom Views with SwiftUI
同时预览多个View
1
2
3
4
5
6
7
8
9
10
11
12
13
14struct RoomDetail_Previews: PreviewProvider {
static var previews: some View {
Group {
NavigationView {
RoomDetail(room: testData[0])
}
NavigationView {
RoomDetail(room: testData[1])
}
}
}
}增加动效
- 给视频图标增加过渡动效
1
2
3
4
5
6if room.hasVideo && !zoomed {
Image(systemName: "video.fill")
.font(.title)
.padding(.all)
.transition(.move(edge: .leading))
}
给图片的动效延长时间
1
2
3
4
5.onTapGesture {
withAnimation(.easeInOut(duration: 2)) {
self.zoomed.toggle()
}
}
支持动态增加
监测数据模型的改变,实时更新UI
创建RoomStore储存Room模型
1
2
3
4
5
6
7
8
9import SwiftUI
class RoomStore {
var rooms: [Room]
init(rooms: [Room] = []) {
self.rooms = rooms
}
}遵守
ObservableObject协议1
2
3
4class RoomStore: ObservableObject {
@Published var rooms: [Room]
// ···
}声明
EnvironmentObject类型变量1
@EnvironmentObject var store: RoomStore
传入
EnvironmentObject类型变量1
2
3
4
5
6struct ContentView_Previews: PreviewProvider {
static var previews: some View {
ContentView()
.environmentObject(RoomStore(rooms: testData))
}
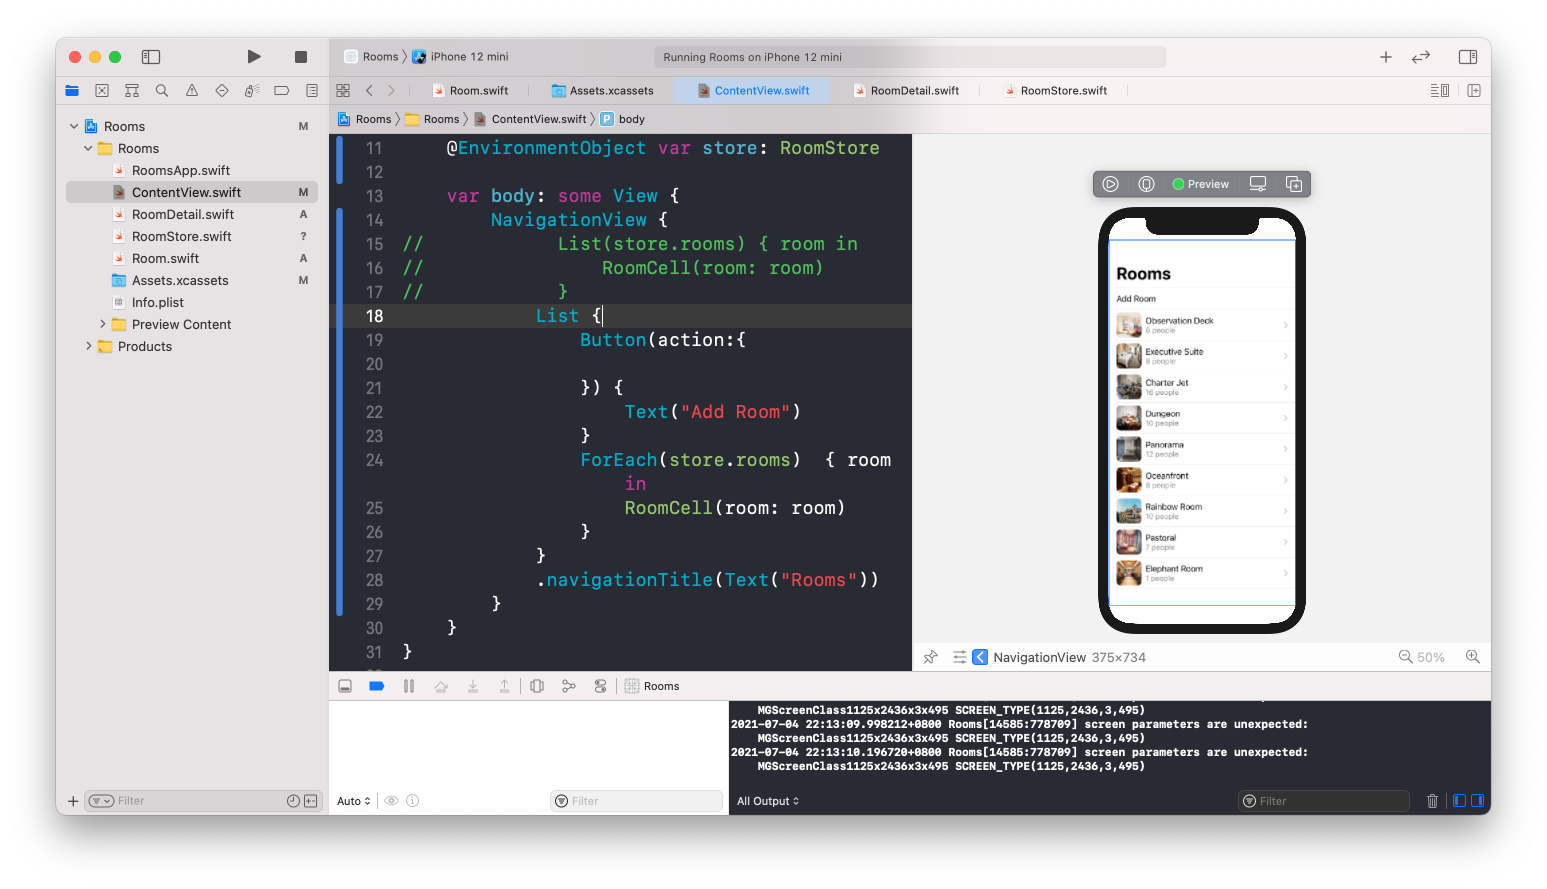
}列表中增加一个按钮
1
2
3
4
5
6
7
8
9
10
11List {
Button(action:{
}) {
Text("Add Room")
}
// ForEach为它的每个集合项都创建一个视图
ForEach(store.rooms) { room in
RoomCell(room: room)
}
}
1
2
3
4
5
6
7Button(action:addRoom) {
Text("Add Room")
}
func addRoom() {
store.rooms.append(Room(name: "Hall 2", capacity: 2000))
}
修改List的样式
修改
listStyle1
2
3
4
5
6
7NavigationView {
List {
// ···
}
.navigationBarTitle(Text("Rooms"))
.listStyle(GroupedListStyle())
}设置分组
1
2
3
4
5
6
7
8
9
10
11
12
13
14List {
Section {
Button(action:addRoom) {
Text("Add Room")
}
}
Section {
ForEach(store.rooms) { room in
RoomCell(room: room)
}
}
}
支持动态删除
1
2func delete(at offsets: IndexSet) {
store.rooms.remove(atOffsets: offsets)1
2
3
4ForEach(store.rooms) { room in
RoomCell(room: room)
}
.onDelete(perform: delete)
设置NavigationBarItem
1
2
3
4
5
6
7NavigationView {
List {
}
.navigationBarItems(trailing: EditButton())
}支持列表重新排序
1
2
3func move(from source: IndexSet, to destination: Int) {
store.rooms.move(fromOffsets: source, toOffset: destination)
}1
2
3
4
5ForEach(store.rooms) { room in
RoomCell(room: room)
}
.onDelete(perform: delete)
.onMove(perform: move)
设置预览环境
1
2
3
4
5
6
7
8
9
10
11
12
13
14
15
16
17Group {
ContentView()
.environmentObject(RoomStore(rooms: testData))
// 大字号环境
ContentView()
.environmentObject(RoomStore(rooms: testData))
.environment(\.sizeCategory, .extraExtraLarge)
// 深色模式
ContentView()
.environmentObject(RoomStore(rooms: testData))
.environment(\.colorScheme, .dark)
// 布局方向
ContentView()
.environmentObject(RoomStore(rooms: testData))
.environment(\.layoutDirection, .rightToLeft)
.environment(\.locale, Locale(identifier: "ar"))
}
总结
SwiftUI四个主要设计原则:
- Declarative
- Compositional
- Automatic
- Consistent
SwiftUI使用陈述性语法
在SwiftUI中,Xcode预览可以让我们浏览、编辑和调试APP,我们甚至不需要运行项目工程